One of the things that makes a drive worthwhile is great company and great music. Especially if the drive ahead is long and you need to while away the hours. Nobody wants a boring ride, so livening it up with music is essential. In order to get your music blaring, you need to install a subwoofer in your car. Fortunately, installing a sub is not that hard, especially if you have basic electrical knowledge.
Before starting, make sure that you have a subwoofer box for your subwoofer speaker. This will prevent damage and will make the installation safer and easier. Next is to make sure that your subwoofer and amp can work together without destroying each other. Instead of looking for the peak power, look at the RMS rating when choosing your amp and sub. Keep the impedance the same in both devices. The impedance is the one measured with Ohms.
Once your sub is safe and compatible with the amp, it’s time to put it to the car. Get your tools ready and get a wiring partner for this project. You can do this alone, but you would get an easier time if you have someone to help you.

Installing A Subwoofer In 4 Easy Steps
Things That You Need:
- Amplifier Wiring Kit
- Ring Terminal
- Subwoofer
- Amp
- Fuse
- Inline converter (if needed)
Note: The Amplifier Wiring Kit will have everything that you need in one place, that’s why it is recommended in this project. However, if you have spare 10 gauge foot insulated wire (for power and ground), RCA cables, in-line fuse, and speaker wire laying around, feel free to omit this step.
Step 1: Preparation For Installation
Subwoofers need a great amount of power, and that’s the reason why it should be connected to the battery directly. But since the battery is usually located in the engine bay and the sub is usually somewhere else, you need to use a power wire to connect the two. In order to do this, you need to find an unused rubber grommet in your firewall. Using a knife or a cutter, make a hole where you would slide the power wire.
If you chose to buy a wiring kit, all of the things you need for this installation are already available. However, if you have spare wires, make sure that all that you need will be available. The insulated power wire (usually red) should be at least 8 gauge, but the thicker, the better. RCA cables are also needed. Before everything else, make sure that the negative terminal of the battery is disconnected.
Step 2: Running The Wires
The next step is to slide the power wire through your engine bay and make sure that it won’t touch any metal surfaces. In your engine bay, attach your ring terminal to the power wire and connect it to the battery. While you’re at it, you can add an in-line fuse, preferably 50 amps or higher, to prevent the battery from getting short. The closer the fuse to the battery, the better. After this, run your wirings to the trunk of the car. Use the wire channel if you have one or slide your wire through the rubber grommet. You can adjust the power wire if it’s too long. Connect the power wire to the amp.
Step 3: Remove The CD Player
Get your CD player (the head unit) out of the dash. The unit should have a blue wire with white stripes, which is called the remote wire. What the remote wire does is that it tells the CD player that the amp is on. Solder the remote wire from the CD player to the remote wire that you have from your kit and connect it to the amp. Adjust the wirings, keep them neatly together.
Step 4: Connecting Components
Attach the amp to the sub. This is where you use the speaker wires. The reason for this is to make removal of the sub easy, in case more space is needed in the trunk. Make sure that both the amp and the sub are on a flat surface.
Now that the amp and the sub are connected, and you should connect the remote wire and the RCA cable to the CD player or the head unit. If the head unit doesn’t have a subwoofer output, use an inline converter. Bring the power back and enjoy the newly installed subwoofer in your vehicle. Make sure to do a proper tuning so you can get the sound that you want from your sub.
Source: https://www.youtube.com/watch?v=21QM2hbFtgc&t=96s
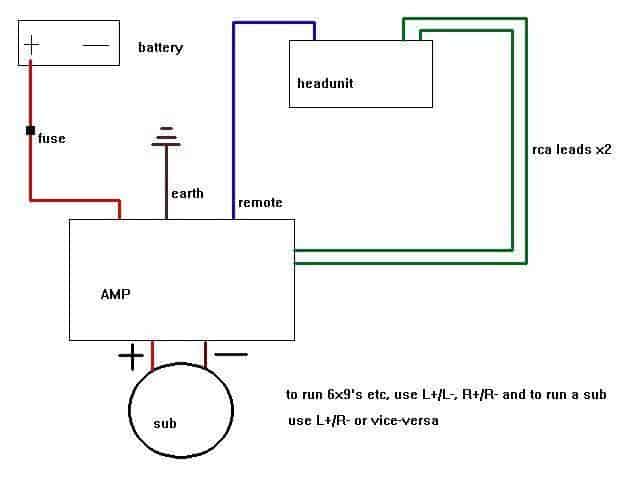
Diagram
After the installation, your wirings should look like the diagram in the picture. The red wire is the power wire, which should be connected to the amp from the engine bay to the trunk. Blue wiring is the remote wire, which is the one soldered for longer connection. Green wiring is for the RCA leads. An inline converter should be in between if ever you don’t have a sub output. The wires connecting the amp and the sub is the speaker wire, which is made of thin copper wiring.

From 10TenMag
Conclusion
And that’s it for this tutorial article. Installing a sub might have slight differences, depending on the car being worked on, the amp, and the sub itself. Make a thorough preparation, especially if you’re still in the shopping period. Match the subwoofer and the amplifier to get the best sound. If you have multiple subs, make sure that those have the same coil type and impedance. Thanks for reading this tutorial. Share it with your friends if you learned something. Check out other articles on the site to know more about subwoofers and cars in general.
Related Topic: Fastest Way On How To Prevent Unauthorized Access To Bluetooth Speakers
